You’ve probably watched a tutorial where someone walks you through a website, a software tool, or a step-by-step process while their computer screen is being recorded. It looks smooth and professional—but you might wonder:
“How are they recording their screen like that?”
The answer is simple: they’re using a screen recorder.
Whether you want to create tutorials, product demos, course lessons, or simple “how-to” videos, understanding what a screen recorder is is the first step. In this guide, we’ll break it all down in plain language so you know exactly what it does, how it works, and when you should use it.
What Is a Screen Recorder?
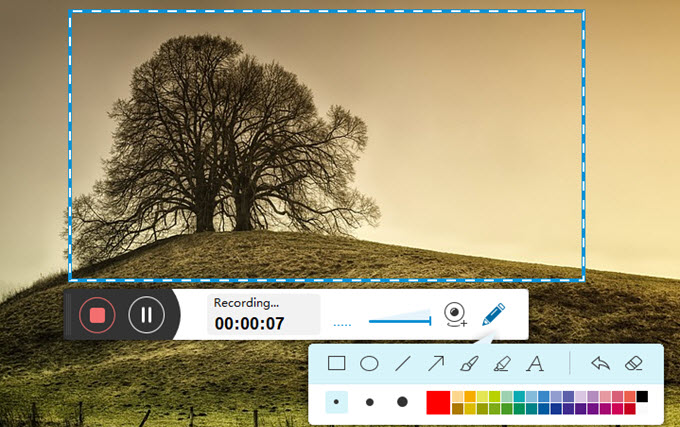
A screen recorder is a type of software tool that captures everything happening on your screen and saves it as a video file.
Imagine pointing a camera at your monitor—but instead of filming from the outside, the software records directly from inside your computer. A screen recorder can capture:
- Your desktop
- A specific window or app
- A selected region of the screen
- Optional webcam video (your face)
- System audio (sounds from your device)
- Microphone audio (your voice)
The final result is a video you can watch, edit, share, or upload anywhere online.
Because of this, screen recording tools are some of the most useful software tools for:
- Content creators
- Freelancers
- Teachers and trainers
- Support teams
- Anyone making tutorials or demos
How Screen Recorders Work (Simple Explanation)
Even though different screen recording tools look slightly different, the basic idea is the same. Let’s walk through what happens behind the scenes in a simple way.
1. The Recorder “Watches” Your Screen
Once you start recording, the screen recorder constantly:
- Checks what’s being displayed on your screen
- Captures a series of images (frames) every second
- Puts those frames together into a smooth video
This is just like video—24 or 30 images per second—but captured digitally instead of with a physical camera.
2. It Captures Audio at the Same Time
Most screen recorders let you choose which audio sources to record, such as:
- System audio – sounds from videos, apps, notifications, music
- Microphone audio – your voice while you explain what you’re doing
- Both at once – perfect for tutorials, walkthroughs, and reactions
The tool then syncs the sound with the video stream, so what people see and hear matches.
3. It Compresses Everything into a Video File
All of those frames and audio samples are encoded into a standard video format such as:
- MP4
- MOV
- AVI
- MKV
The screen recorder chooses a resolution, frame rate, and bitrate based on your settings. This affects:
- Video quality
- File size
- Smoothness of playback
Most beginners can stick to the default settings, and they’ll still get good results.
4. Optional: Built-In Editing and Annotations
Some screen recording tools include simple editing features:
- Trim the beginning or end
- Cut out mistakes
- Add arrows or boxes to highlight important areas
- Blur sensitive information (emails, IDs, etc.)
- Add zoom-in effects or cursor highlights
Others work together with separate video editors so you can polish your recording after you’re done.

Key Features and Benefits of Using a Screen Recorder
1. Clear Visual Communication
Some things are much easier to show than explain in text. With a screen recorder, you can:
- Walk someone through a website
- Demonstrate software steps
- Show exactly which buttons to click
This is perfect for tech tutorials, onboarding, and support.
2. Save Time on Repeating the Same Explanation
Instead of explaining the same process over and over on calls or chats, you can:
- Record a single, clear walkthrough
- Share it whenever someone asks
- Reuse the same video for multiple people
This saves huge amounts of time for:
- Support teams
- Freelancers working with clients
- Course creators and coaches
3. Create Tutorials, Courses, and Digital Products
If you’re in the make money online space, screen recording is a key skill. With it, you can create:
- Full video courses
- Tech tutorial bundles
- Paid workshops and training sessions
A simple combination of screen recording + good explanations can become real digital products.
4. Capture Live Webinars, Calls, and Meetings
Many people use screen recording to:
- Save important video calls
- Capture live webinars for replay
- Keep a record of training sessions
This is especially useful if you later want to:
- Pull clips for social media
- Turn a live session into a course module
- Share highlights with your team
5. Record Gameplay or App Demos
Gamers and app developers use screen recording tools to:
- Record gameplay sessions
- Capture bugs and glitches
- Show how new features work
This is ideal for YouTube, feedback videos, marketing, and documentation.

Step-by-Step Beginner Guide: How to Use a Screen Recorder
Let’s walk through a simple, no-stress workflow you can follow, even if you’re new.
Step 1: Install or Open a Screen Recording Tool
You have a few options:
- Built-in tools (like system recorders)
- Browser-based screen recorders
- Dedicated desktop screen recording software
For your first try, choose something with a simple, beginner-friendly interface.
Step 2: Choose What You Want to Record
Most screen recorders let you pick:
- Entire screen – good for full demos and walkthroughs
- Single window – great for focused tutorials on one app
- Custom region – useful when you want to hide other parts of your desktop
Choose the option that matches your video goal. For most beginners, recording a single window is the easiest.
Step 3: Set Your Audio Sources
In the audio settings, choose:
- Microphone – if you plan to talk during the recording
- System audio – if you want to capture internal sounds (video playback, music, etc.)
- Both – ideal for tutorials and commentary
Do a quick test:
- Say a few words
- Check the input meter in the recorder
- Make sure your voice is being picked up clearly
Step 4: Adjust Basic Quality Settings (Optional)
If your tool allows it, you might see options for:
- Resolution – 1080p (Full HD) is a solid default
- Frame rate – 30 fps is fine for most tutorials
- Output format – MP4 is widely compatible
If you’re not sure, stick with the defaults. You can tweak them later once you’ve done a few recordings.
Step 5: Hit Record and Perform the Action Slowly
When you’re ready:
- Click Record.
- Wait for the countdown (often 3 seconds).
- Start your process or walkthrough.
Some tips while recording:
- Move slowly between steps so viewers can follow
- Say what you’re doing out loud (if recording your voice)
- Pause briefly before big actions so editing is easier later
Step 6: Stop, Review, and Trim
When you’re done:
- Click Stop.
- Play the recording back inside the tool.
- Check for:
- Clear audio
- Readable text and icons
- Smooth cursor movement
If your tool has a trim feature, cut off awkward moments at the start or end where you were getting ready.
Step 7: Save and Share
Finally:
- Export/save your recording as an MP4 or similar
- Upload it to your preferred platform (video host, course platform, file storage, etc.)
- Embed it into blog posts, course lessons, or help docs
Examples of Screen Recorders in Real Life
1. Blogger Creating Software Tutorials
A blogger writing about software tools:
- Records their screen while using a tool
- Explains each step verbally
- Embeds the video inside the blog post
Readers can watch and learn instead of only reading instructions.
2. Course Creator Teaching a Dashboard
An online course creator:
- Uses a screen recorder to walk through a dashboard
- Breaks the training into short, focused videos
- Uploads them to a course platform
Students get clear, visual lessons that are easy to pause, rewind, and review.
3. Freelancer Sending Client Updates
A freelancer working with clients overseas may:
- Record a quick screen walkthrough
- Show design changes, analytics, or campaign results
- Send the video instead of writing a long email
This saves time and reduces misunderstandings.
Tips for Beginners Using Screen Recording Tools
- Plan your steps first. A quick outline keeps your recording clean and focused.
- Keep your desktop tidy. Close unrelated windows and hide anything personal.
- Use a decent microphone. Even a basic USB mic is better than a noisy laptop mic.
- Talk slowly and clearly. Imagine explaining to someone who has never seen the screen before.
- Practice with short recordings. You don’t need your first attempt to be perfect.
(Internal link → /guides-tutorials/how-to-guides/)
Common Mistakes to Avoid
Recording Everything at Once
Trying to cover too many steps in a single take often leads to:
- Confusing explanations
- Messy mistakes
- Hard-to-follow videos
Instead, create shorter, focused videos for specific tasks.
Ignoring Audio Quality
Great visuals with terrible audio still feel unprofessional. Avoid:
- Loud background noise (fans, traffic, people talking)
- Microphones too far from your mouth
- Speaking too fast
Good audio makes even simple screen videos feel much more premium.
Not Checking What’s Visible on Screen
Before recording, double-check that you’re not showing:
- Private messages
- Personal email addresses
- Sensitive client data
If your recorder has a blur or crop feature, use it to hide those areas.
Using High Settings on a Weak Computer
Recording at ultra-high resolution and frame rates on a low-powered device can cause:
- Choppy video
- Lag
- Crashes
Start with 1080p, 30 fps, and see how your computer handles it.
Forgetting to Save Your Work
Some beginners close the recorder before saving. Always ensure you:
- Click Save or Export
- Confirm the file location
- Back up important recordings
Advanced Insights: Growing with Screen Recording
Once you’re comfortable with basic recordings, you can level up by combining screen recording with:
- AI tools that turn your recordings into written documentation or summaries
- Video editors for adding intros, outros, and callouts
- Automation (recording recurring processes, documenting SOPs, etc.)
Screen recording becomes not just a way to make tutorials but a core skill for:
- Building courses
- Selling digital products
- Providing training and consulting services
Conclusion
A screen recorder is one of the most powerful yet beginner-friendly software tools you can use. With it, you can:
- Capture your screen as video
- Add your voice and explanations
- Create tutorials, demos, lessons, and more
You don’t need to be a tech expert to start. If you can follow simple steps and explain what you’re doing, you’re already capable of creating useful screen recordings. Start with a basic tool, record a short process, and build from there.
(Internal link → /screen-recording-tools/)
Frequently Asked Questions
If you’re a complete beginner, start with whatever you already have: Windows has Xbox Game Bar or a built-in screen recorder, and Mac has the Screenshot Toolbar or QuickTime. If you want something slightly more advanced but still easy, Loom and ScreenPal are excellent screen recording tools with free plans.
For most topics, 5–15 minutes is ideal. Shorter videos are easier to watch and less intimidating. For big topics, consider splitting your content into a series of shorter tutorials rather than a single 45-minute recording.
Many software tools allow screen + webcam recording, including Loom, OBS Studio, Camtasia, and ScreenPal. Simply enable the webcam option, position the camera window in a corner, and check your video preview before recording.
Aim for at least 1280×720 (HD). If your computer can handle it, use 1920×1080 (Full HD). Both work well on YouTube and most course platforms. Just make sure your on-screen text is large enough to read.
In most cases, yes—you can record tutorials showing how to use software tools, especially for educational purposes. However, avoid recording sensitive or private data and using copyrighted music or video clips without permission. If you’re unsure, check the terms of service of the software or consult a legal professional for commercial use.
Zahid Ali focuses on reviewing AI tools, marketing software, and funnel systems. His reviews break down real-world use cases, setup difficulty, pricing structures, and who each product is best suited for.